This article explains how to configure a BACnet device, from start to finish. The configuration process is divided into three stages, one for each menu you will visit.
Creating a BACnet Connection
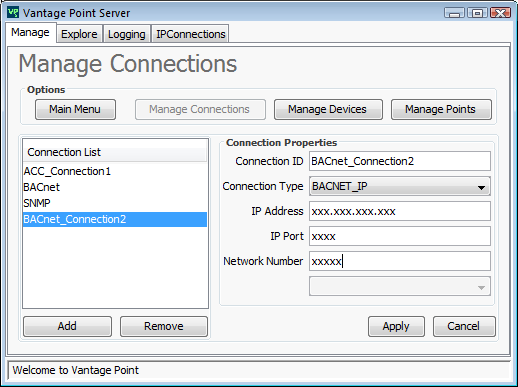
Before you can communicate with an BACnet device, you need to create a connection to the device. To create a connection, you must go to in the Manage Connections menu.
Start by clicking the Add button, to add a new connection to the list.
The 'New Connection' should be selected (highlighted in the list) at this point. If it is not selected, you will need to select it by clicking on it.
Once the 'New Connection' is selected, you must provide a unique Connection ID. You can name it whatever you want, but it must be unique. It is a good idea to name it something short, and descriptive.
Next, change the Connection Type to BACnet, by selecting it from the drop-down box. It is important to choose the Connection Type before you change any other properties, because certain properties are unique to the Connection Type.
The BACnet connection requires an IP Address, IP Port, and sometimes a Network Number. These will be unique to your network, so you will have to look them up, ask your network admin, or figure them out on your own. You must provide the IP Address and IP Port of the BACnet device in order to communicate with it.
Once you are finished, click the Apply button.
Creating an BACnet Device
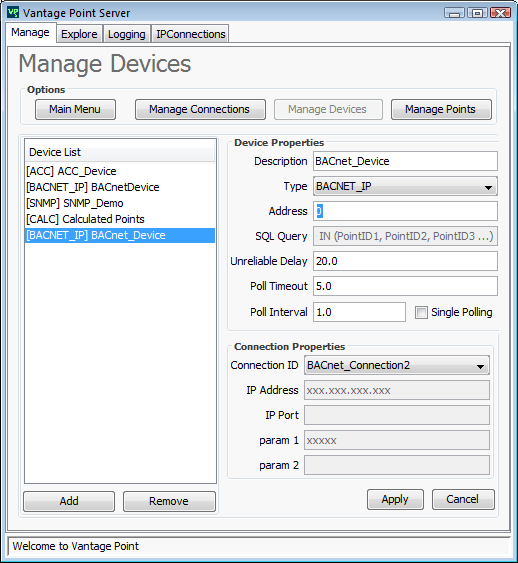
Assuming that you have created the BACnet connection (see previous stage if not), it is now possible to configure an BACnet device. To create a device, you must go to in the Manage Devicesmenu.
Start by clicking the Add button, to add a new device to the list.
The 'New Device' should be selected (highlighted in the list) at this point. If it is not selected, you will need to select it by clicking on it.
Once the 'New Device' is selected, you should provide a new description for it. It does not have to be unique, but it should at least try to be descriptive.
Change the Type of the device to BACnet. It is important to choose the Type of the device before you change any other properties, because certain properties of the device are unique to its Type.
The BACnet device configuration requires an Address number to identify which BACnet device the Vantage Point Server should poll (You will need look this up).
The Unreliable Delay determines how sensitive the server is to unreliable connections. The value represents how many seconds to wait before marking the device as 'Unreliable' when the remote device enters the 'Unreliable' state. If the remote deviceis consistently unreliable for this amount of time, only then will it be considered truly unreliable by the Vantage Point Server. The default value of 20 seconds is recommended.
The Poll Timeout determines how many seconds to wait before giving up on a response from the device. If you have a very slow connection, you may have to raise the value. The default is 5 seconds.
The Poll Interval determines how many seconds to wait between polling the device. The default is once every second.
Select the Connection ID corresponding to a valid BACnet connection (the one you made in the previous stage, if you started from the beginning)
Don't forget to apply your changes, by clicking the Apply button.
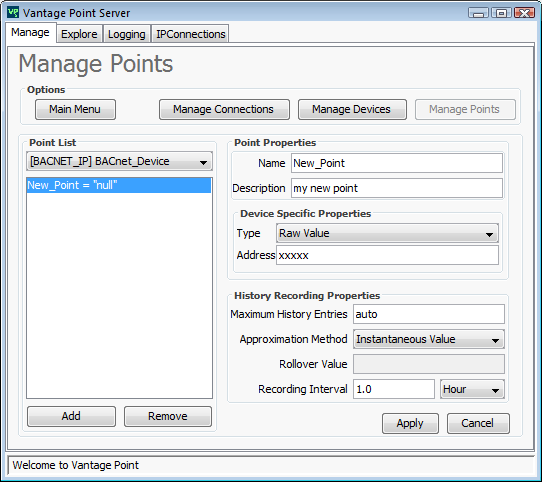
Creating an BACnet Point At this stage, you should have a fully configured BACnet device, upon which to add points (see previous stage if not). To create a point, you must be in the Manage Points menu.
Start by clicking the Add button, to add a new point to the list.
The 'New_Point' should be selected (highlighted in the list) at this point. If it is not selected, you will need to select it by clicking on it.
Once the 'New_Point' is selected, you must provide a unique name for the point, without any spaces or special characters in it (use letters, numbers, and underscores only). If the point's name is not unique, it will be made unique by adding a number to the end. If you plan on using this point in a Calc-Point equation, you must not use any special characters or reserved keywords in the name.
Optionally, you may enter a description into the Description field.
You may choose between four types of points (although Raw Value is typically acceptable in most cases)
Raw Value - The point's value will be exactly the same as the raw value found in the remote device.
Binary - The point's value will be set to either ON (if the remote value is greater or equal to zero) or OFF (if the remote value is less than zero)
Integer - The point's value will be rounded to an integer
Text - The point's value will be treated as text (same as Raw Value)
The default settings for History Recording Properties are set to the recommended settings for most cases. If you are polling at a high frequency, and want higher resolution history, you may want to change some of these settings
(see History Recording Propertiesfor more info)